20 June 2012

Cook's Illustrated: Peanut Butter Sandwich Cookies

Cook's Illustrated: Peanut Butter Sandwich Cookies

The problem with a sandwich cookie is that you think of it as one cookie, but when you eat two you're actually eating four cookies plus the filling. My limit is three cookies in one sitting.

Back in April, my mom picked up a Cook's Illustrated magazine that what looked like a great recipe for peanut butter sandwich cookies. The crisp, thin cookies are sandwiched with a tasty peanut butter filling, and both the components are easy to make.

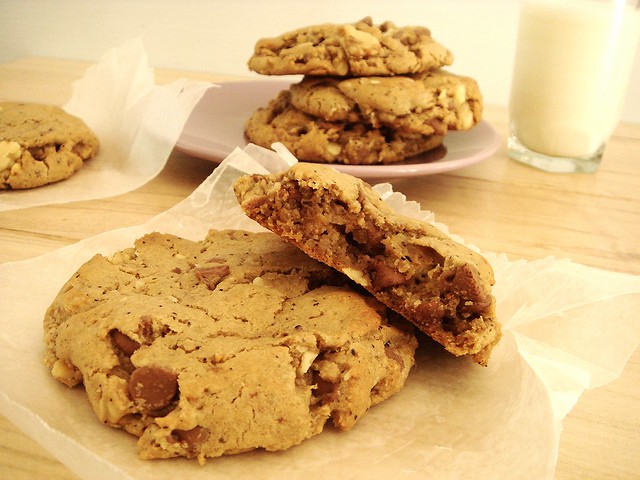
Besides peanut butter, the dough also has ground peanuts, giving the cookies more depth of flavor. The filling reminded us of Reese's Peanut Butter Cups. Everything combined makes for one tasty cookie.

Cook's Illustrated: Peanut Butter Sandwich Cookies

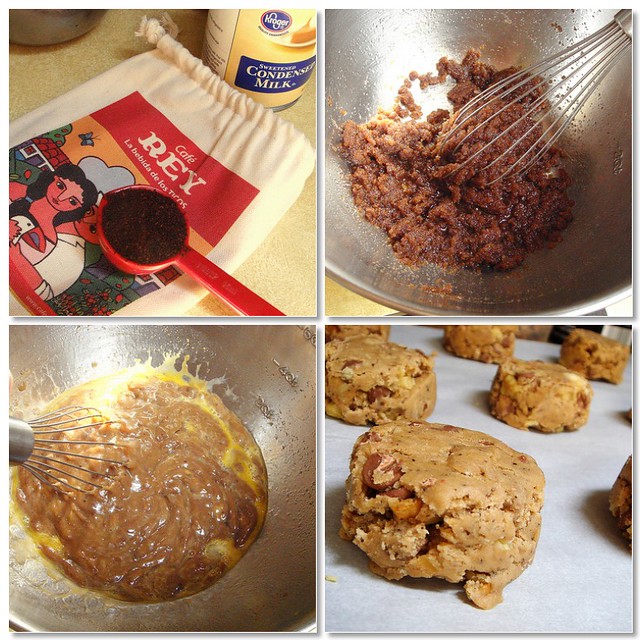
Since I didn't have regular peanut butter, I used natural peanut butter in both the cookie dough and filling. I added a few extra tablespoons of flour and shortening so the dough wouldn't be too soft. As it is, the dough is pretty slack, but it needs to be in order for the cookie to bake up thin and crisp.

Cook's Illustrated: Peanut Butter Sandwich Cookies

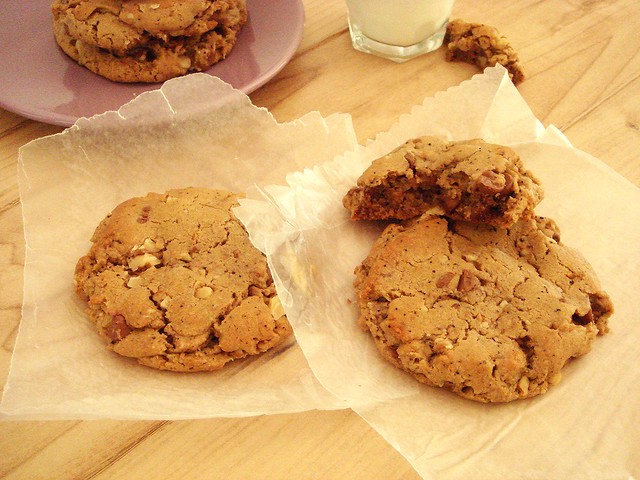
After baking two sheets of cookies, I decided that 350 degrees was just too high, even when I baked them less than required. The edges were a little too dark and almost looked burnt, so I lowered the temperature to 325 degrees and baked them for 15 minutes. The cookies were still thin and crispy, but looked golden brown.

Cook's Illustrated: Peanut Butter Sandwich Cookies

Look at these tasty cookies! The cookies are a little crumbly when you bite into them, but it sticks together thanks to the creamy filling. Irresistible. I had 1.5 cookies.

Recipe after jump.


Peanut Butter Sandwich Cookies
Recipe modified from Cook's Illustrated

Makes 24 cookies

Ingredients -

1 1/4 cup roasted peanuts
3/4 cup all-purpose flour
1 teaspoon baking soda
1/2 teaspoon salt
3 tablespoons unsalted butter, melted
1/2 cup creamy peanut butter (if using natural peanut butter, add 2 tablespoons shortening and an additional 2 tablespoons flour)
1/2 cup granulated sugar
1/2 cup packed light brown sugar
3 tablespoons whole milk
1 large egg

Filling -

3/4 cup creamy peanut butter
3 tablespoons unsalted butter
1 cup confectioners' sugar

Directions -
  1. Preheat oven to 325°. Line a baking sheet with parchment paper. Pulse peanuts in food processor until finely chopped. Whisk flour, baking soda, and salt together in a bowl. Whisk butter, peanut butter, granulated sugar, brown sugar, milk, and egg together in a second bowl. Stir flour mixture into peanut butter mixture with a rubber spatula until combined. Stir in peanuts until evenly distributed.

  2. Using a tablespoon measure, place 12 mounds, evenly spaced, on the prepared baking sheet. Using a damp hand, flatten mounds until 2 inches in diameter.

  3. Bake until golden brown and firm to the touch, 15 to 18 minutes. Let cookies cool on sheet for 5 minutes. Transfer cookies to wire rack and let cool completely, about 30 minutes. Repeat portioning and baking remaining dough.

  4. For the filling: Microwave peanut butter and butter until butter is melted and warm, about 40 seconds. Using a rubber spatula, stir in confectioners' sugar until combined.

  5. To assemble: Place 24 cookies upside down on work surface. Place 1 level tablespoon warm filling in center of each cookie. Place second cookie on top of filling, right side up, pressing gently until filling spreads to edges. Allow filling to set for 1 hour before serving (I didn't). Assembled cookies can be stored in an airtight container for up to 3 days.

SHARE:

25 May 2012

Brown Butter Oatmeal Biscotti

brown butter oatmeal biscotti

Out of all the cookies I claim to be my favorite, biscotti are my one true love. They're crunchy and not too sweet, perfect for post-breakfast or a light dessert. I got into a biscotti-making kick a few years ago and managed to create three recipes, though I only blogged about two of them.

brown butter oatmeal biscotti

My inspiration for these biscotti probably occurred during my brown butter craze faze. I'm surprised I didn't add any orange zest because I was in the habit of flavoring everything orange, too. Instead, I stuck to freshly grated nutmeg and toasted, ground oatmeal.

Toasted oatmeal is a great ingredient to add to baked goods. It has a very nutty, light taste. Because of the oatmeal, it's a little easier to pretend that a few biscotti are a good idea for breakfast.

brown butter oatmeal biscotti

This must have been one of those recipes I made to test out, then forgot all about. Though I did make it again for gifts, and I gave the recipe to a friend who made it and said it was good. It's that whole picture taking step I sometimes have a problem doing.

And so I made them to document on Tuesday, because it's going to get so hot this weekend (97° on Sunday - global warming came early this year!) that I knew I wouldn't want to bake now.

brown butter oatmeal biscotti

Biscotti require a few extra steps compared to traditional cookies. Once the logs are baked, they're sliced on the bias and baked again to brown. Because my version contains fat (butter and eggs), they don't get as hard as some biscotti do; what I mean is that you can eat them without dunking in coffee.

I'm warning you now - biscotti are high-yield cookies. Biscotti morning, noon, and night! Italian cookies are that way and that's why I like them.

brown butter oatmeal biscotti

I can feel another biscotti kick coming on. Perhaps I'll try a tropical biscotti. If you give this recipe a try, let me know how it goes!


Print this recipe


Brown Butter Oatmeal Biscotti
Recipe by Christina Provo

Yields around 36 mini biscotti

Ingredients -

2 cups plus 1 tablespoon all purpose flour
1/2 cup toasted rolled oats, ground to a powder (to toast oats, spread on a baking sheet and toast in a 350° oven for 10-13 minutes; cool before grinding)
1/2 teaspoon freshly grated nutmeg
1 1/2 teaspoons baking powder
1/2 teaspoon kosher salt
1/2 cup butter, browned, refrigerated until solidified to the consistency of room temperature butter
3/4 c sugar
2 eggs, room temperature
1/2 teaspoon almond extract

Directions -
  1. Preheat oven to 350°. Line a baking sheet with parchment paper.

  2. In a medium bowl, whisk together flour, oat powder, nutmeg, baking powder and salt. In a large bowl, beat together browned butter and sugar on medium for 2 minutes. mix in almond extract, then beat in eggs one at a time until well blended.

  3. Stir in flour mixture, mixing and pressing gently with the back of a rubber spatula until combined. The dough will not be sticky at all, and there may be large pieces of dough that are not combined with the lump, but as you form the logs you can easily press them together. Be careful not to overmix at this stage; as long as there isn't any powdery mixture remaining, you're all set.

  4. Divide dough into thirds, and place on the prepared baking sheet, evenly apart. pat each mound out to a log about 1 1/2-inches wide by 9-inches long. Bake for 20 minutes or until tops are ightly golden and firm when pressed. Transfer parchment sheet, with logs, onto a cooling rack and cool for 15 minutes.

  5. Place one log on a cutting board and slice on the diagonal into 1/2 inch slices. place slices on baking sheet (no parchment needed), and repeat with remaining logs. Bake for 10 minutes; remove sheet and flip biscotti over. Continue baking for another 10 minutes. The biscotti should be dry to the touch and golden. Place biscotti on a wire rack to cool completely.

SHARE:

15 May 2012

Running Foodie's Chocolate Chip Cookies

running foodie chocolate chip cookies

Just in time for National Chocolate Chip Day. Actually, I didn't plan that at all - I'm the last to know about all these ancillary food holidays, and I'd go crazy trying to blog recipes for all of them. 

Running Foodie Chocolate Chip Cookies

Instead, I choose to repeat recipes with variations to keep myself from being bored. I suppose I could make a more complex cookie except that I've had this lazy streak I can't seem to shake. I have plans, though. Plans that look eerily similar to a baguette. Plans that remind me of granola bars. Things like that.

running foodie chocolate chip cookies

These cookies, though. They're thick, chewy, full of flavor, and incredibly simple to make. What makes them unique isn't the use of brown butter. It's not the ground coffee. It's the sweetened condensed milk. I looked around the internet and found a recipe that uses condensed milk, though their version creams the butter like a traditional cookie and doesn't use any other sweetener. I'm stuck on chocolate cookies with brown sugar because it has a caramelized toffee flavor. The texture is unbeatable, too. After my first test, I knew I struck gold.

Because the butter is melted you don't need to bust out a mixer. Just whisk the cooled butter with the brown sugar, then whisk in condensed milk, egg, and the remaining ingredients. You do need to refrigerate the dough overnight, but whatever. Except for having to wait a day to bake them (a hour or two might suffice, though I haven't tried it), these are great for spur of the moment baking impulses.

The key to thick cookies is using a lot of dough per ball. (That's not anything you don't already know.) These aren't the biggest cookies, but they're bigger than I normally make. Each ball uses 1/4 cup of dough, and I don't shape them into balls - I press chilled dough into a measuring cup, then pop it out with a spoon which creates a perfect disc of dough. You do need to press it down a little, about 3/4", so that the dough cooks evenly. If it's too thick, it won't spread as nicely. If you press it too much, it will be too thin. Get it? It's a little easier and less messy than rolling them into balls, too.


running foodie chocolate chip cookies


Print this recipe
it's best to copy/paste into a word doc 


SHARE:

22 March 2012

Lazarus Chocolate Chunk Cookies

Lazarus Chocolate Chip Cookies

There are a million and one ways to make a chocolate chip cookie. You've either tried them all and are still looking, or you've found a recipe you like so much that you quit looking. I'm in the middle of the two, and when a customer of my dad's gave him a recipe for chocolate chips cookies along with a sample (a long time ago), I knew I needed to try this other version.

You have probably heard of it before. The version I made is called Lazarus Chocolate Chunk Cookies, also known as the Neiman-Marcus cookie. What makes it different from other recipes is the addition of oat flour which gives the cookie complexity without changing the texture too much. Along with chocolate chunks (or chips), melted chocolate gets swirled into the dough.

Lazarus Chocolate Chip Cookies

I added a tablespoon of instant espresso powder to the dough, and I suggest you do the same. You could also sprinkle the tops with coarse salt and sub some of the all-purpose flour for bread flour, a la the NYT chocolate chip cookie. Perhaps in place of instant espresso powder you could add freshly ground coffee to the dough like I did in for the NYT cookies. Possibilities are endless. I'm constantly merging recipes to find my ultimate recipe, so I play around a lot.

Lazarus Chocolate Chip Cookies

The oat flour is what does it for me. I was so impressed by the flavor and chewy texture back when I first tried this recipe that I started experimenting with oat flour in other recipes, like a biscotti recipe I need to blog about, and my recently posted oatmeal scones. Because of the chips and melted chocolate, this cookies packs an intense chocolatey punch. Next time, I'd use more brown sugar than white because I like a deeper molasses-like flavor in the dough portion.

So, even if you have already found your favorite go-to chocolate chip cookie recipe, I urge you to give this recipe a try. It may not replace your favorite recipe, but it will give you another option for when you want a cookie with a little more substance.

Recipe after jump.


Print this recipe

Lazarus Chocolate Chip Cookies
Recipe from various sources on the internet

Ingredients -

2 cups all-purpose flour
2 1/2 cups oats, ground to a flour in the food processor)
3/4 teaspoon kosher salt
1 teaspoon baking powder
1 teaspoon baking soda
1 cup unsalted butter, at room temperature
1 cup granulated sugar
1 cup brown sugar, packed
2 large eggs, at room temperature
1 tablespoon instant espresso powder
2 teaspoons pure vanilla extract
12 ounces semisweet chocolate chips
4 ounces melted milk chocolate chips

Directions -
  1. Preheat oven to 375°; line a baking sheet with parchment paper and set aside. In a medium bowl, whisk together flour, oat flour, salt, baking powder, and baking soda.

  2. In a large bowl, beat butter with both sugars until light and fluffy, about 2-3 minutes. Add eggs, one at a time, and beat until combined. Add espresso powder and vanilla and mix just until combined. Using a large wooden spoon or spatula, stir in the flour mixture until a few streaks of flour remain. Add the chocolate chips and melted chocolate, stirring until chips are mixed throughout dough. Chill in refrigerator for 30-60 minutes.

  3. Portion out 1-2 tablespoon portions onto prepared baking sheet, leaving about 1-2 inches of space in between dough balls. Press down with palm of your hand until the cookies form 1/2-inch thick disks. Bake for 10-13 minutes, or until tops of cookies are just set and edges have browned slightly. Let cool on baking sheet for 10 minute, then remove to a wire rack to cool completely.

SHARE:

01 February 2012

flourless peanut butter chocolate cookies

flourless peanut butter chocolate cookies

Ever find yourself in the mood to bake cookies, but are either out of ingredients or short on time? Here's a recipe for you. I often turn to these flourless peanut chocolate cookies from Martha Stewart when I'm in the mood for a quick cookie. These cookies consist of just peanut butter, an egg, sugar, leavening, salt, and chocolate chips. The original recipe uses peanuts, though I often substitute other ingredients like more chips, or oatmeal, like in today's variation.

flourless peanut butter chocolate cookies

I used quick oats, thinking it would blend better in the dough. It did, but I should have used less than half a cup because I think the oats soaked up a lot of moisture and made the refrigerated dough difficult to work with.

flourless peanut butter chocolate cookies

The best part about these cookies is that you don't need a mixer. Simply stir the sugar, baking soda, salt, and egg with the peanut butter, then in stir the chips and additional ingredients. You can bake them immediately or let the dough chill. I've done both and found that the cookies have smoother tops after being refrigerated and the dough is easier to form, but it tastes just the same.

flourless peanut butter chocolate cookies

After rolling the dough into balls, I press them down to half-inch disks. The dough sometimes doesn't spread much, especially when it has been chilled, so this helps them spread out more as it bakes. These didn't spread as much as they typically do because of the oats. I also used 1 tablespoon portions like the recipe says although I usually use 2 tablespoons because I like the look of big, beautiful cookies.

flourless peanut butter chocolate cookies

These are the best when just underbaked. The cookies are soft and buttery, and surprisingly not dense. The fat in the peanut butter contributes to the cookie's texture, and the warm peanut butter flavor is incredible. If I had some ice cream I'd crumble some of the just baked cookies on top. Yummy.
SHARE:

03 January 2012

Oh Nuts Pistachio Rum Balls

Oh Nuts Pistachio Rum Balls

I still remember the day I tried my first rum ball. It was part of a Christmas cookie package and the aroma of the rum permeated the tin. It was chewy, strong, and delicious.

Immediately afterward, I looked up recipes and was amazed by how simple rum balls are to make. It's almost like a Larabar in texture, though very unlike a Larabar except for the nuts. Do you think they'd ever make a rum ball Larabar?

Oh Nuts Pistachio Rum Balls

Oh Nuts had sent me these roasted, unsalted pistachios back in December. I had thrown ideas around, never settling on anything. Time eventually flew by and I still hadn't made anything with them. As New Year's approached, I decided the proper use for them would be in a rum ball.

Oh Nuts Pistachio Rum Balls

Rum balls are classified as a no-bake cookie. All you do is finely grind the nuts, finely grind vanilla wafers (or puffed rice cereal, shortbread cookies, etc.), and mix the two with confectioners' sugar, a bit of cocoa powder. The dough is made by stirring in rum and corn syrup. I hadn't finely ground the nuts enough, or the wafers, so I think it affected the consistency. I added a little extra water, corn syrup, and rum. I wanted to add more rum, but I hoped the amount I did add (1/3 cup total) would become stronger as the dough refrigerated overnight.

Oh Nuts Pistachio Rum Balls

When I started rolling them out, I tasted a bit of the dough. There was a little bite of rumminess in the back of your throat, but it wasn't as strong as I remembered. I ended up liking the flecks of pistachio and was glad I didn't grind them more finely after all.

Oh Nuts Pistachio Rum Balls

You can coat these in anything you want, like melted chocolate, chopped nuts, sprinkles... I chose cocoa powder mixed with confectioners' sugar.

Oh Nuts Pistachio Rum Balls

It's a good thing I didn't add more rum or else nobody would have enjoyed them. I'll have to make myself a stash of rum balls some other time.

The texture on these was great. They held their shape, but it was very soft and chewy. They're addictive, though I only managed 5 over the course of the night. I bet these would be great to fuel a run, don't you think?

If you're interested in the recipe, check out the recipe at Joy of Baking.
SHARE:

02 May 2011

chocolate biscuit cake

chocolate biscuit cake

In light of recent events, you may have thought news of the Royal Wedding was over. Not true, guys! Although I'm not here to discuss the wedding, I am here to talk about my favorite part of all events -- the food. The groom's cake for this wedding was called a "chocolate biscuit cake". It really wasn't a cake at all, but a ganache mixed with McVitie's digestive biscuits. At the end of the day, it's a candy bar.

It was my mom's idea to make it because I was a bit put off by the cake when I first heard of it. I'm glad we made it because it truly is a delicious dessert.

chocolate biscuit cake

First ingredient is good chocolate. You can use your favorite. Chocolate chips take a little longer to melt, but are good to use, too. Since you need about 11 ounces of chocolate, it's more economical to purchase one bag instead of 3 bars of chocolate.

chocolate biscuit cake

Almonds get chopped and toasted, giving the cake some crunch. The animal crackers get soft after a day so you can add more almonds if you want.

chocolate biscuit cake

Melted chocolate and butter get whisked into eggs beaten with sugar. The eggs give the chocolate a different texture, more fudgy and soft, than just cream will. If you're worried about salmonella, add a teaspoon of lemon juice. The heat from the chocolate might not be enough to cook the eggs.

chocolate biscuit cake

Once the chocolate is blended in, the mixture begins to get stiff. We added heavy cream and a few tablespoons of the orange juice used to soak the raisins and to lighten the chocolate.

chocolate biscuit cake

Here are the raisins. In the background, you can see the animal crackers being mixed into the chocolate. McVities weren't available, though I know I saw them once. I like the animal crackers in place of graham crackers, which get soggy really quickly.

chocolate biscuit cake

After everything is mixed together, it gets smoothed into a springform pan, greased and lined with parchment paper. This was refrigerated a few hours, though you could also make it a day ahead of time so it chills overnight.

I highly suggest this cake. Although it's not a cake in the true sense of the word, as someone might point out to you, everyone will like it anyway. The cake isn't as heavy as you might think, and the orange gives the chocolate fruity undertones. Now that I've made this, the idea of a layered chocolate biscuit cake covered with ganache icing seems incredible!


chocolate biscuit cake
Inspired from this recipe and this recipe

ingredients -

11.5 ounces bittersweet chocolate
1/2 cup (1 stick) unsalted butter
2 large eggs, room temperature
1/2 cup granulated sugar
1/3 cup heavy whipping cream
8 ounces digestive biscuits or animal crackers, broken into almond size pieces
zest of 1 orange
1/2 chopped almonds, toasted
1/4 cup raisins, soaked in 1/4 cup fresh orange juice (reserve soaking liquid)

directions -
  1. Melt chocolate in a mixing bowl placed over a saucepan of gently simmering water. In another saucepan (or microwave-safe bowl) melt butter.

  2. In a large mixing bowl, stir together the eggs, sugar, and heavy cream until mixed well. Add melted butter and chocolate. Add orange zest, raisins, 3 tablespoons reserved soaking liquid, and nuts to the chocolate mixture. Gradually fold in the crushed biscuits (or graham crackers), until biscuits are evenly distributed throughout the chocolate.

  3. In a greased 8-inch springform pan lined with parchment paper, spread the chocolate mixture and smooth out evenly. Cover entire pan with plastic wrap.

  4. Refrigerate for 5-8 hours, or overnight. Cut into thin slices.

SHARE:

28 April 2011

Once Upon A Tart Honey Madeleines

once upon a tart madeleines

I'm back with more Once Upon A Tart recipes. I have a reader request for scones from Once Upon A Tart that I'll put up soon. In the meantime, I'll tell you about the madeleines I made from the cookbook a month or so ago.

once upon a tart madeleines

Madeleines are considered a French cookie, though they are more akin to a sponge cake than what you would recognize as a cookie here in the States. In order to make them, you need a special scallop-shaped >madeleine tin. I bought my tins from Wayfair.com. I chose to get the steel tins because I like how they cook better than the nonstick tins, which cost twice the price that these did. If you grease the molds properly, it won't take much effort for the madeleines to release without any trouble.

once upon a tart madeleines

The batter is a is a lightly sweetened, buttery sponge cake. I didn't feel that there was much of a honey presence, but I'm sure it added to the overall flavor of the madeleines. After preparing the batter, you refrigerate it to chill for at least 30 minutes. I looked this up on various sites and they say the chilling contributes to the humps that form on the tops of the madeleines, which is the mark of a well-made cake.

once upon a tart madeleines

The original recipe says to grease the madeleines by brushing the molds with butter. I used the directions from other recipes, which say to mix flour with the butter and then brush the molds. Since this procedure is like the PAM baking spray, I figured it would prevent excess sticking from occurring.

once upon a tart madeleines

One recipe makes 12 madeleines, so I doubled the recipe. I ended up with more than 24 and I'm not sure how that happened. More to eat!

once upon a tart madeleines

The madeleines baked perfectly in about 10 minutes, rising nicely and forming a brown crust. I needed to prod them out of the molds a little, but not much stuck to the tins.

I'm happy to finally have madeleine tins because I've been wanting to make these for a while. Sure, they're basically a muffin/cupcake, but they're extremely cute and unusual. Think of all the madeleine variations you could make, like red velvet or mini chocolate chip! I am also going to suggest these madeleine tins. The price was good and they baked the madeleines evenly.


Honey Madeleines
Recipe from Once Upon A Tart

Makes 12 madeleines

ingredients -

4 tablespoons unsalted butter; plus more, melted, for brushing in madeleine molds
1 tablespoon honey
1/2 teaspoon vanilla or almond extract
2 large eggs
1/3 cup granulated sugar
1 tablespoon packed light brown sugar
3/4 cup unbleached all-purpose flour
1 teaspoon baking powder
A pinch of salt
Confectioners' sugar for dusting madeleines

directions -
  1. Melt the 4 tablespoons butter in a small saucepan over low heat, being careful not to burn or brown the butter. Remove pot from the stove. Stir in the honey and the extract, and let cool to room temperature.

  2. Beat the eggs and sugars together in a big bowl, using an electric mixer on high speed, until the eggs are foamy and light in color.

  3. In a separate, small bowl, whisk the flour, baking powder, and salt together. Slowly fold these dry ingredients into the wet, with the mixer on low speed (or stirring with a wooden spoon or rubber spatula), stopping as soon as no flour is visible. Pour in the cooled butter-honey, and continue mixing until all the ingredients are combined. Cover the bowl and refrigerate for at least 30 minutes, until the batter is chilled.

  4. Before removing the dough from the refrigerator, position your oven racks so that one is in the center and preheat the oven to 425 degrees. Brush your madeleine molds with melted butter.

  5. Take a spoonful of batter and pushing it off with your finger, fill each mild to three-quarters full. Madeleines rise a lot, so don't overfill the molds. The goal is to have the cookies retain their perfect little scallop shape.

  6. Place the mold on the center rack in the oven, and bake the madeleines for 8-10 minutes, or until they are puffed up above the edge of the mold and each madeleine has a bump on it, like the hump of a camel. You don't want to overbake these; take them out when the edges have turned golden brown.

  7. Remove the mold from the oven, and set it on a wire rack for a few minutes, to cool enough so that it's easy to work with. Don't let it cool for too long. Ideally you want to eat the cakes while they're still warm. Lift the mold off the rack, and set it on your work surface. Place the rack on top of the mold ad flip it upside down. The madeleines will fall right out. (I prodded mine out with the top of a butter knife.)

  8. If you're not serving the madeleines warm, once they've cooled to room temperature use a strainer to sprinkle a thin dusting of confectioners' sugar on the seashell side of the madeleines. They're so pretty this way that it almost makes up for the fact that they're not still warm.

SHARE:

20 April 2011

caramel bacon bars

caramelized bacon bars

I was debating between which recipe to enter in the Foodbuzz BACONALIA contest, sponsored by Denny's. At first, I had made up my mind to submit the bacon wrapped pears, but at the last minute wanted to tweak a recipe for caramel bars, using crumbled bacon and bacon grease instead of all the butter in the original recipe. These are nowhere near as healthy as the former recipe, though they are addictive and swayed my opinion on which recipe to enter.

caramelized bacon bars

These couldn't be any simpler to make. First, you cook the bacon until crisp, saving 1/4 cup bacon grease. Graham crackers line the bottom of a foil-lined baking sheet and are topped with mini marshmallows.

caramelized bacon bars

Brown sugar is melted in a saucepan with bacon grease, butter, and cinnamon. A little vanilla is stirred in afterward, and then it gets drizzled over the graham crackers.

caramelized bacon bars

To finish, the top is sprinkled with unsweetened flaked coconut, sliced almonds, and the crumbled bacon.

caramelized bacon bars

The end result is a gooey, sticky treat that's similar to a candy bar and cookie, all in one. The bacon provides a satisfying saltiness to what would otherwise be an overwhelmingly sweet treat. What I liked the most is that these can be prepared in less time than it takes to make cookies, perfect if you want something fast that doesn't require a lot of effort.

caramelized bacon bars


Print this recipe

caramel bacon bars
Adapted from Taste of Home

ingredients -

12 whole graham crackers
4 cups miniature marshmallows
6 slices bacon, cooked until crispy, and crumbled
1/2 cup unsalted butter
1/4 cup bacon grease
3/4 cup packed brown sugar
1 teaspoon ground cinnamon
1 teaspoon vanilla extract
1 cup sliced almonds
1 cup unsweetened flaked coconut

directions -
  1. Line a 15-in. x 10-in. x 1-in. baking pan with foil; grease lightly. Preheat oven to 350 degrees. Place graham crackers in pan; cover with marshmallows. In a saucepan over medium heat, cook butter, bacon grease, brown sugar and cinnamon until the butter is melted and sugar is dissolved. Remove from the heat; stir in vanilla.

  2. Spoon over the marshmallows. Sprinkle with almonds, coconut, and bacon crumbles. Bake for 15 minutes or until browned. Cool completely. Cut into 2-in. squares, then cut each square in half to form triangles.

SHARE:

07 March 2011

peanut butter espresso cookies with candied bacon

peanut butter espresso cookies with candied bacon

A conversation I had a while ago about candied bacon chocolate chip cookies sparked the idea of baking a batch of my peanut butter espresso cookies and stirring in chopped candied bacon.

At first, the idea of bacon in cookies sounds repulsive. I don't like when syrup touches bacon, so I wasn't sure what I would think of however this turned out.

peanut butter espresso cookies with candied bacon

The first step is to candy the bacon. To do this, you place strips of bacon on a parchment-lined rimmed baking sheet and sprinkle with brown sugar. You then bake for about 30 minutes total.

peanut butter espresso cookies with candied bacon

The bacon needs to be a deep brownish-red color in order for the bacon to harden when cooled. The bacon in the picture actually wasn't cooked long enough and never got crispy, so I stuck it back in the oven to cook a bit longer.

peanut butter espresso cookies with candied bacon

You want the bacon crispy, no chewy, so it won't be difficult to chop into pieces.

peanut butter espresso cookies with candied bacon

I decreased the chocolate chips to 1/2 cup and stirred in the bacon, 10 strips worth. My initial thoughts was, "Ew, I just bit into bacon." After a while, though, I didn't really feel like it made the cookie taste bad, and it was actually rather nice. My dad thought it tasted like oatmeal.

The cons, however, is that the amazing texture of the candied bacon wasn't present in the cookie. The pieces you bit into weren't crunchy, but chewy. I think if I had coated the bacon in chocolate, let it harden, then used that in place of the chocolate chips the flavor might have remained and created an even better cookie. But the subtle bacon with the coffee coating was rather good in its own way.

As an alternative, you can also sprinkle candied bacon on roasted Brussels sprouts, green bean casserole, salads, and mashed potatoes. Or oatmeal.

I'm entering this to Lisa's "Sweets for Saturday".


Candied Bacon
Recipe adapted from Pete Bakes!

ingredients -

Strips of bacon (I used ten)
Brown sugar
1 recipe Peanut Butter Espresso Cookies

directions -
  1. Preheat oven to 350 degrees. Line a rimmed baking sheet with parchment paper. Place strips of bacon flat on sheet, making sure they don't overlap. Sprinkle each slice with about 2 tablespoons of brown sugar, rubbing it in a bit.

  2. Cook for 15 minutes. Flip bacon over, dragging slices in syrup. Continue cooking for another 15-17 minutes, or until the bacon is a deep mahogany color. Remove from oven and let cool slightly. Transfer bacon to a cooling rack to cool completely. Coarsely chop into pieces, or leave whole (if you don't think you'll resist).

SHARE:
Blogger Template Created by pipdig